


Saturday, November 29, 2008
Tissue Paper Pom Poms
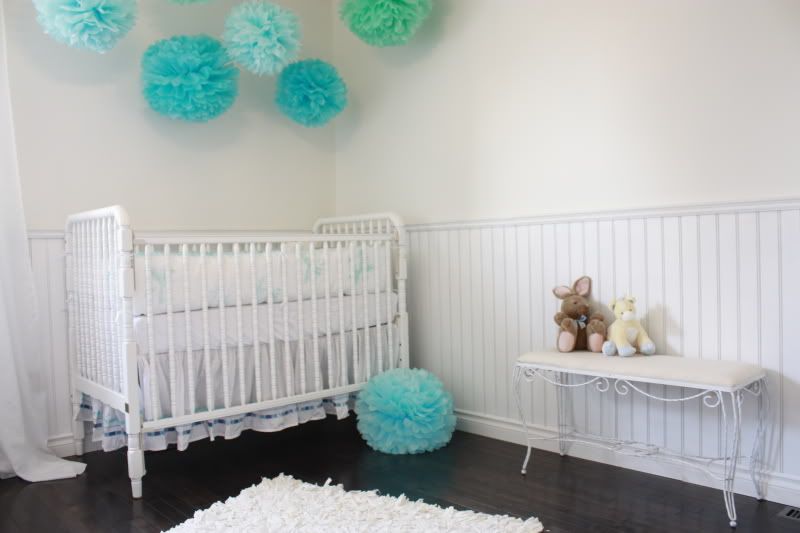
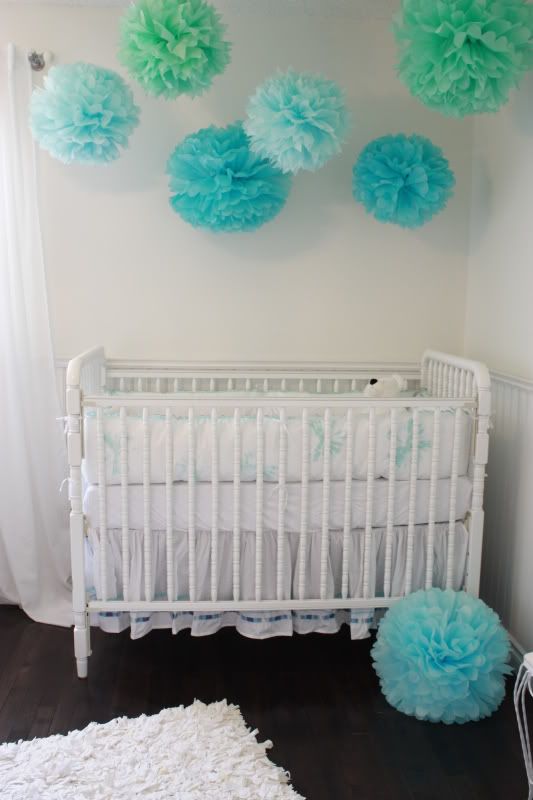
This week we pretty much finished the nursery and only have the chandelier to hang (which we will do on Monday when I will share pics!). I had a blast putting together these Martha Stewart tissue paper pom poms to hang over the crib instead of a mobile and just wanted to give them a great review for anyone considering using them for a party or home decor. They are easy to assemble and look just as good in real life as they do on the box, which makes them a great project for a new DIYer. The kit can be purchase at your local Michaels or you can buy them online at http://www.marthastewartcrafts.com/detail.php?p=58378
Tuesday, November 25, 2008
Diaper Station Re-Do
Wow! The last 2 weeks have been a whirlwind of activity over here, and while I can't wait to share the final pics, I do have one project that I think turned out pretty great (if I do say so myself). For those of you who know me, you already know that I love to buy old things and make them new again, especially when it comes to furniture. I think it adds character to a room by mixing things up and not sticking with manufactured, coordinating pieces. Last spring I spied this really cute dresser on my local Craigslist, and picked it up for a measly $25, knowing that while I didn't have room for it at the time it would come in handy later on. I decided to refinish it to go in the baby's nursery as a change table, and so here are the easy steps to refinish a piece you might have sitting in the basement or garage that is just begging for a second chance:
1. Strip the piece with a handheld electric sander. You could do it manually with sand paper, but it will be a little more time consuming.

2. Prime the piece so that the old finish doesn't come up and stain your new coat of paint. Then paint away!

3. Add new knobs or pulls for a different look! I actually decided to fore-go knobs all together and instead placed these fun, faux-antique enamel numbers on each drawer to add a unique twist since it is for a nursery.

Now I just need to add the change pad (and the baby!)
Thursday, November 20, 2008
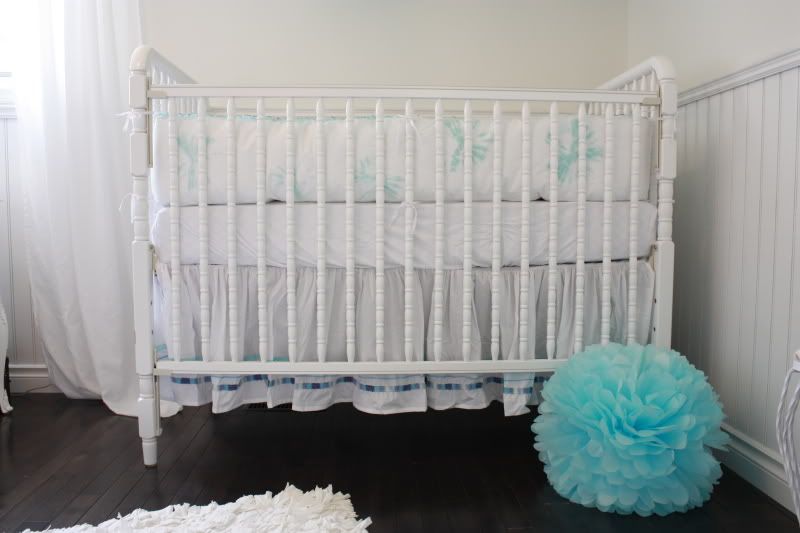
Welcome to Wren's Room!
We ripped out all of the carpet and moulding almost immediately after moving in. We then laid new hardwood floors (espresso stained Birch), installed wainscotting and new trim, as well as new electrical outlets, switches and a chandelier.
BEFORE:

Rachel Ashwell tie dye crib bedding.

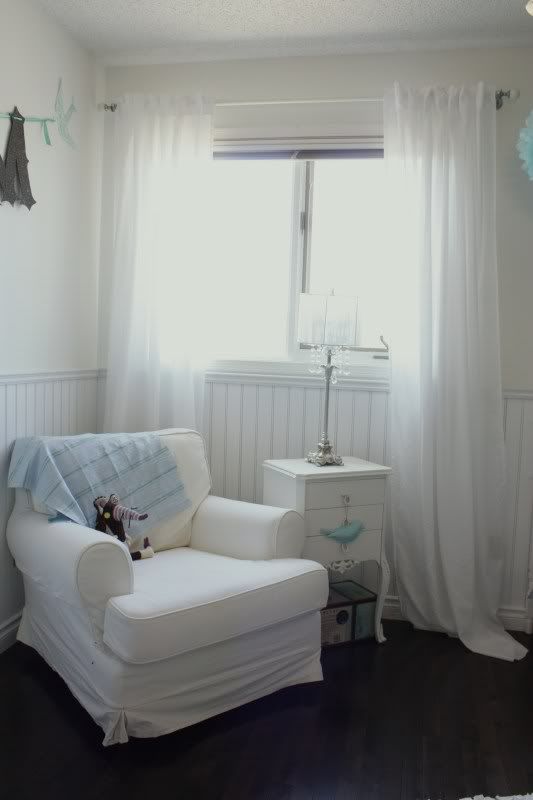

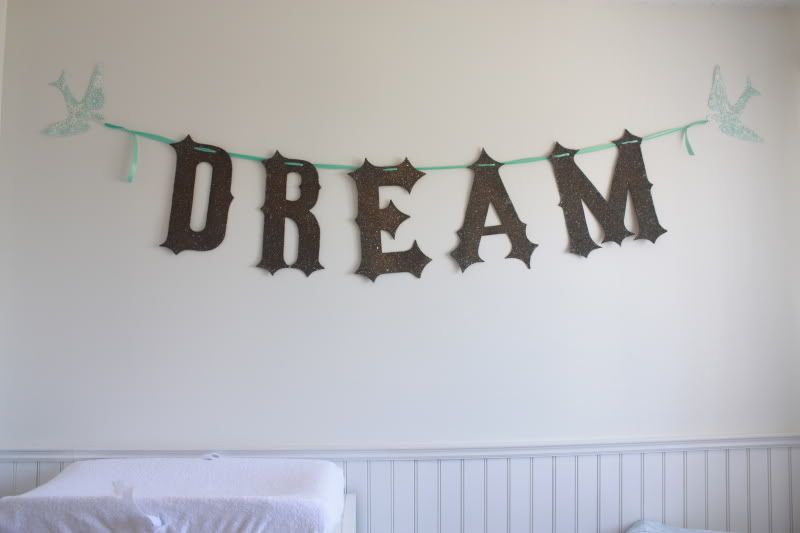
Wendy Addison antique glitter glass DREAM garland.
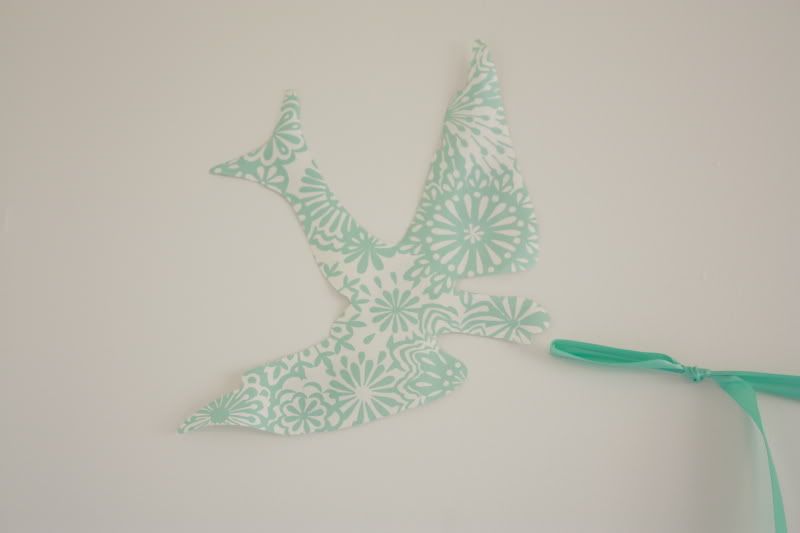
The doves are made out of Martha Stewart wrapping paper.
In stead of buying a change table we found this dresser on Craigslist for $20 and refinished it.

After: We sanded, primed and painted then added antique enamel numbers to add an little bit of whimsy.

BEFORE:
AFTER:
Martha Stewart pom pom kit from Michaels.
Martha Stewart pom pom kit from Michaels.
Rachel Ashwell tie dye crib bedding.
Wendy Addison antique glitter glass DREAM garland.
The doves are made out of Martha Stewart wrapping paper.
In stead of buying a change table we found this dresser on Craigslist for $20 and refinished it.
After: We sanded, primed and painted then added antique enamel numbers to add an little bit of whimsy.
Fantastic Fabrics
I was browsing a really cool online fabric store last night that I just have to share: http://www.tonicliving.com/ . They have a huge selection of fun, retro, and unique prints, and the prices are really great too! The best part is that they even recommend matching fabrics that will work well with the one you selected. Here are a few of my favs, now I just have to find time to think of a project to use them in!


Wednesday, November 19, 2008
Big Updates coming soon~
Last night we spent the night sleeping on a mattress in the future nursery. We FINALLY completed the floors, wainscotting and trim in there, but since we have moved on to a new destruction zone (aka the master bedroom) we decided to set up house in the baby's room for now. I am sure she won't mind...
If all goes as planned and we finish up in there tomorrow or Friday I will happily be able to start decorating our bedroom, which frees up the nursery to also be started on (perfect timing since our crib arrives next week).
After about 2 months of craziness I can finally see it all coming together, and while we have A LOT to do still, at least it is starting to resemble home.
Monday, November 17, 2008
So Fun
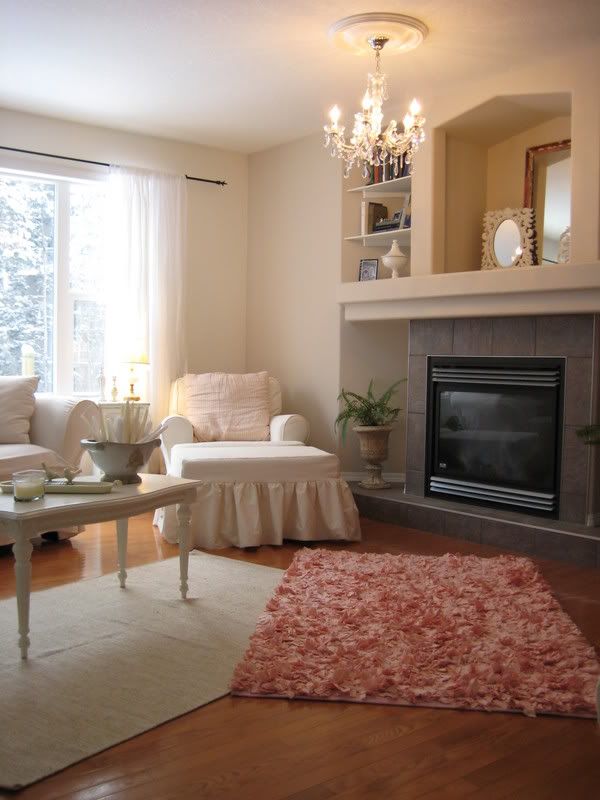
I wanted to share a home that has inspired me over the last few months that I saw in Style at Home magazine. It belongs to decorator and entrepreneur Herma Vegter-Petrie of Oakville, Ontario. I absolutely love the fun twist on a crisp, clean, white home. Her unique pieces really create a space that feels welcoming and yet sophisticated. Now I just need to find out where to score that fabulous highback love seat.


Thursday, November 13, 2008
Rug Recycle
2,500 sq feet of new hardwood floors, new baseboards and trim, full bathroom (x 3) and kitchen renovations, not to mention all the tools and miscellaneous trips to Home Depot really does start to add up, even when you cut costs at every corner and do it yourself! My goal for the next couple of months is to find as many odds and ends around the house that just don't work for us anymore design-wise and make them fit in new and interesting ways, and then share them with all of you! Not only is this the eco-friendly solution to solve my design delima, but it also frees up $$ to spend on things that we actually do still need to buy (ie: new appliances).


My first attempt is a VERY easy project that even the most amateur DIYer would have a hard time screwing up: bleaching (or dying if you prefer) an old rug.
Last year I stumbled across this adorable and fun rug at a local home store on super sale for $38. While I absolutely adored the pink, Sean found it less than exciting to have this beauty layed out in the living room, especially on his poker nights (seen here in our previous home last November). The plan is to bleach it white and use it in the baby's nursery as the perfect contrast to the espresso floors.
1. The first step is to put the rug in a tub and fill it with the hottest water possible until the rug is just barely covered. Make sure you have a lot of air circulation happening, and open a window if possible, then pour the bleach into the tub (make sure you are wearing thick, cleaning grade latex gloves while doing this so you do not get any bleach directly on your skin). I use 1 part bleach for every 4 parts water. Then you just wait it out until you see the color lightening.

2. Once you have the color completely removed (should not take longer than 45 minutes) drain the tub and let the rug sit for a few minutes. This last step is perhaps the most important if you choose to bleach instead of using dye: because the bleach will continue to eat away at the fabric it is crucial that you counteract it with either an Anti-chlor product or plain old 3% hydrogen peroxide. I refill the tub with fresh water and add the anti-chlor and let it sit again for another hour.

Once you have rinsed it out for the last time it is just time to let it dry!
Wednesday, November 12, 2008
Slowly but surely...
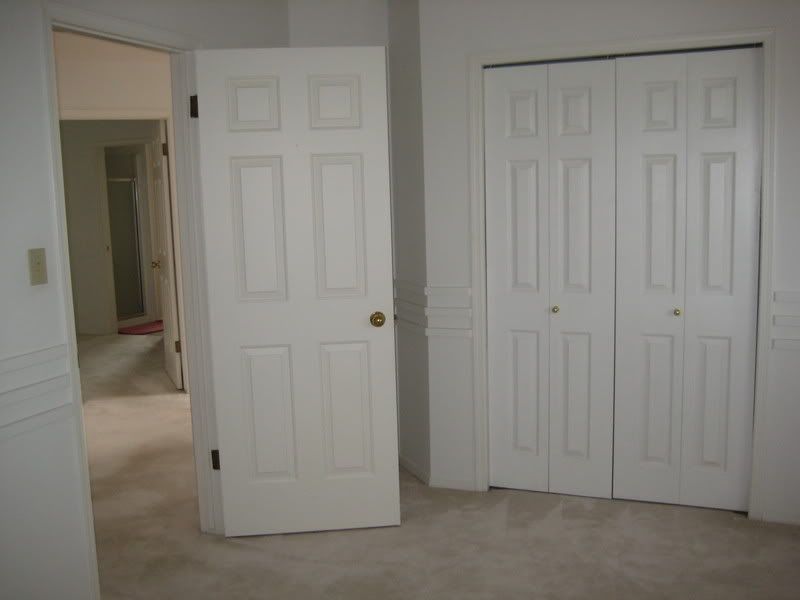
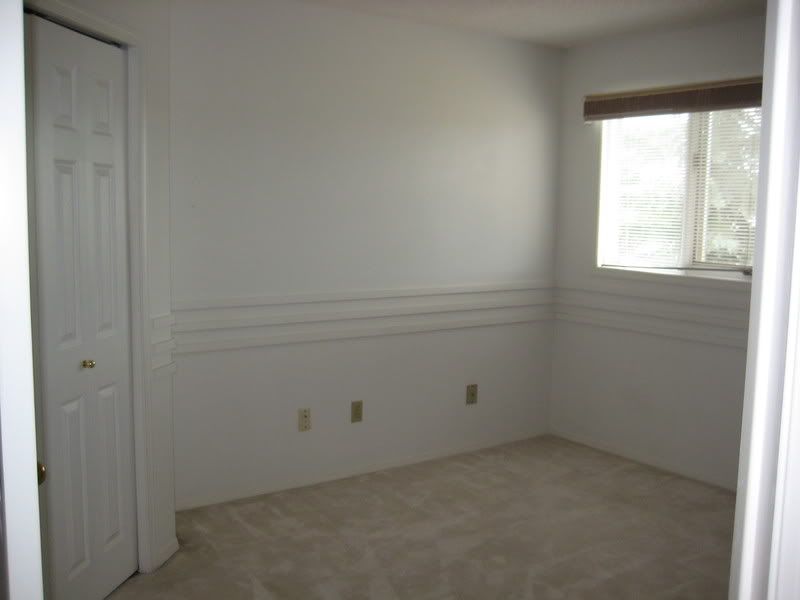
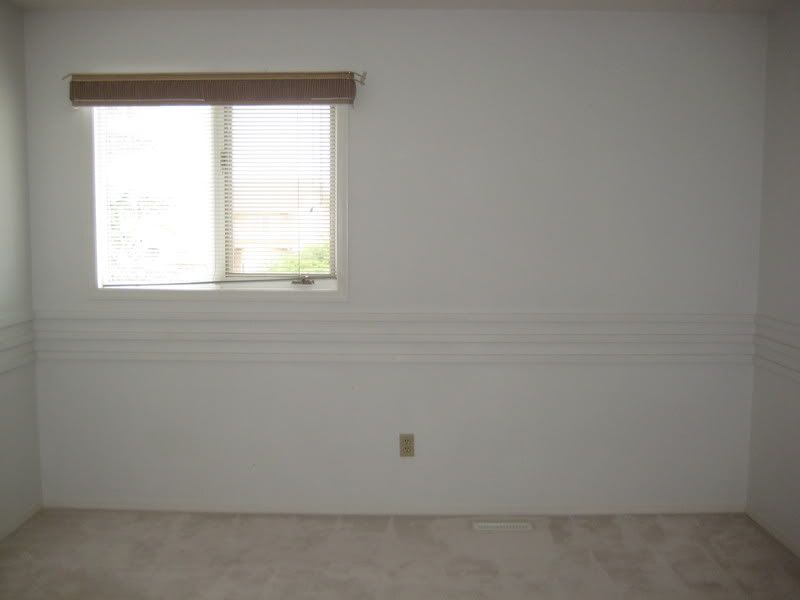
We have started (FINALLY!) on the upstairs bedrooms, and our first room is the future nursery. On our to do list is:
-floors (about 20% done)
-rip out ugly old mouldings (done!)
-patch up holes that will not be covered by wainscotting (done!)
-paint upper half of wall (done!)
-install wainscotting
-install baseboards and moulding
-install new chandelier
-put up new window coverings
-set up furniture and finish decorating
Here are some befores and our current progress: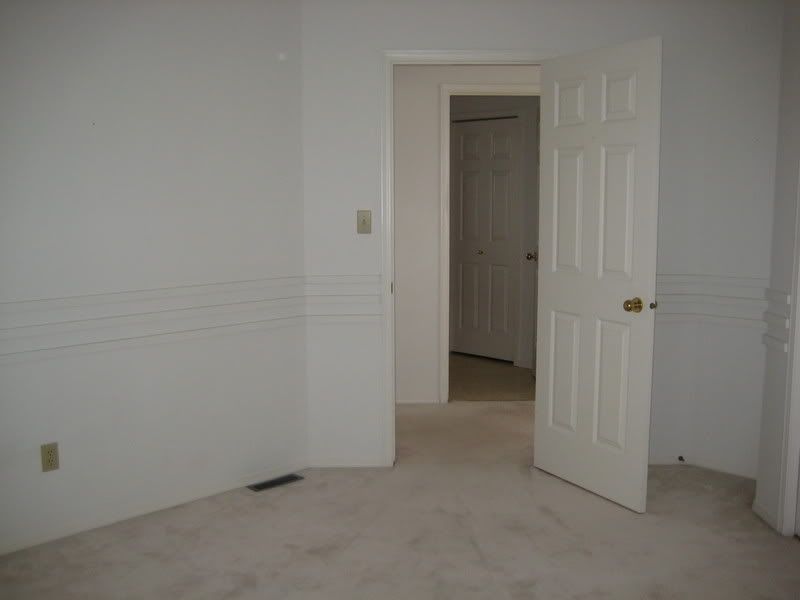


Kitchen Creativity
Instead of thinking up tasty recipes to cook, these days my time in the kitchen is spent dreaming about how I long to reconfigure the crazy layout, ditch the grimy old cupboards, and rip out the hideous old light fixtures. I saw this kitchen while casually googling for ideas the other day and I think I truely found our future kitchen. The floor color is the exact shade as ours and the cabinetry is the perfect shade of cream, now I just need to finish the 1,000 other projects that are ongoing at our house...


Thursday, November 6, 2008
Eco-Logs
When we purchased our house this summer one of the features we were super excited by was the real wood burning fireplace. After having the convenience of a simply switching a light switch to turn on our gas fireplace at our last house we were perhaps a little unrealistic on all the work that goes along with collecting real wood, kindling, and newspaper and then attempting to get them all lit, and even more importantly to stay lit! Deciding that perhaps those easy to use logs you buy at the grocery store were more in line with our needs, we actually tried a few and were happily on our way to once again using our fireplace several nights a week during the fall and winter. That was until we stumbled across Java Logs at our local hardware store! They are made of recycled coffee grounds and are much safer burning as well as being healthier since they do not give off much creosote or carbon monoxide compared to real logs or other brands of quickstart logs. Definitely check them out if you love an easy, low maintenance fire roaring in your fireplace on a chilly evening!

Wednesday, November 5, 2008
I've been Tagged!

Looks like I have been tagged by my buddy, Abby over at Life with B and A: http://lifewithba.blogspot.com/
So here are my 7 random facts:
1. I have a severe fear of Turkeys.
2. I went to an all girls school (uniforms and all!) for Junior High.
3. I was supposed to be born on Christmas Day, but came 2 days early (it was probably the only time in my life I was early for something).
4. Sean and I secretly hope the baby is born early as well because we are so curious to see what she looks like we can hardly stand it!
5. I would eat a Taco Bell Cheesy Gordita Crunch for every single meal every day if I could. I LOVE those things.
6. We finally found a home for all our Koi fish at Big Al's Aquariums, but have no idea if he was going to feed them to his shark collection or sell them. Now we feel kinda bad about not making sure they weren't going to end up as shark food...
7. Dipping strawberries in chocolate fondue is our favorite evening snack!
And now I am tagging these awesome ladies as well:
Excited New Mom, MommyMoreno: http://mommymoreno.blogspot.com/
Jenna: http://jennablife.blogspot.com/
Amber over at It's Easy Being Green: http://organicallyamber.blogspot.com/
Jenn at Pemberton Peanut: http://pembertonpeanut.blogspot.com/
The always fabulous Jen at the perfectbalance: http://perfectbalance-runjen.blogspot.com/
The lovely Dee : http://deesgarret.blogspot.com/
Jennifer at Baby makes Five: http://theverginfamilyblog.blogspot.com/
Tuesday, November 4, 2008
10 weeks to go?
Wow! I can't believe how fast time is flying. With just 10 weeks and a few days until the little one arrives (assuming she doesn't appear earlier than that!) we still have so much to do. I really cannot believe how fast the last 10 weeks have gone by so I am sure that these last ones will too with all the holidays coming up...
But she seems to be getting bigger and sadly most of my clothes are getting far too tight which is really limiting my choices of what to wear in the mornings.

Monday, November 3, 2008
Slackin' on the Blog
So we have definitely let the blog take the brunt of our neglect lately with everything we have going on. Between working on the floors, painting every room of our house and getting the baby's room ready we have barely found time to sit down and eat a meal together in peace! It is hectic around here, but we are so excited by all the progress that has taken place and I can't wait to share pictures with everyone. But even with all this crazy renovating I did find some time to do some shopping on Saturday and got some great goodies for the baby. My favorite thing is this pacifier that closes as soon as it leaves baby's mouth so that it never hits the ground (talk about smart!). It is by Razbaby and comes in a ton of cute animal characters:

http://razbaby.com/pacifier-page.html
http://razbaby.com/pacifier-page.html
Subscribe to:
Posts (Atom)


