


I have to make way for all the lovely stuff I see for Spring and Summer, so that means making some room in my completely PACKED! closet (trust me, the pictures would have you running for the hills). Anyways, over the next couple of days I am uploading a whole bunch of stuff that needs to go! Here is a link to my items I've listed at Jessica Style, since most of them are items seen on celebs: http://www.jessicastyle.com/ads_search.php?search_name=HollyBerry
If you are not a member there feel free to leave me a comment here and I will be glad to give any further info or drop me a line at holhanson23@yahoo.ca .
UPDATED TO ADD: what you see listed is only about half of what I will have up by the end of the weekend, so check back because I have a lot more Juicy Couture, Gucci, and more to put up still~
Saturday, February 28, 2009
Friday, February 27, 2009
Burrito Baby
Wren's daddy has a hidden talent! He can swaddle a baby in under 5 seconds, tighter than any baby knew was possible. It is a sure fire way to put her to sleep or calm her down.
Exhibit A: 1 minute after swaddling

Exhibit B: 1.5 minutes after swaddling

Exhibit A: 1 minute after swaddling

Exhibit B: 1.5 minutes after swaddling

Thursday, February 26, 2009
The Perfect Gift
Tomorrow is Torri's (my little sister) Birthday! She is really into fashion and style so I wanted to get something for her that is fun and trendy. We were randomly browsing Celebrity Style Guide together last Sunday when we saw this headband on Whitney from The City and fell in love:


It is just soooo "Torri". Imagine my excitement when I saw it at Urban Outfitters today, grabbed it and took it to the check out to discover that it was on clearance for only $4.99!!! Score! I really wish they had more than one because after trying it on for size I think it is adorable for these last couple weeks of winter.

Wednesday, February 25, 2009
Random Act of Kindness
I received a pleasant surprise this afternoon when Sean came home from running errands. He had a bouquet of the same flowers that were used in our wedding center pieces (white roses and bells of Ireland). I was already having a great day, but that just made it even better!
And since I am taking pictures in the dining room here is quick glimpse at the current set up. We are on the hunt for a longer, rectangular table and do not have any of the pictures or mirrors hung, but at least it is finally liveable again! (you can click on any picture to enlarge).


And since I am taking pictures in the dining room here is quick glimpse at the current set up. We are on the hunt for a longer, rectangular table and do not have any of the pictures or mirrors hung, but at least it is finally liveable again! (you can click on any picture to enlarge).


Bless This Mess
So now that we have to wait 3 weeks until our tiles arrive to finish the fireplace it looks like we are stuck in limbo with this mess. We want the fireplace hearth completely tiled and grouted before we even consider doing the floors, however we have already removed the wall paper, patched the dry wall, primed, and painted all the walls. I also picked up this amazing antique mantle piece at my favorite local antiques store. It was a bit pricier than I had hoped, and I am going to paint out the cream detail in the middle to match a grey hue in the marble, but it is seriously the perfect dimensions for our fireplace and fits like a glove!


Tuesday, February 24, 2009
Opinions wanted!
We thought we had our fireplace all sorted out and ready to be tiled, but we second guessed ourselves and have decided to use Carrera Marble tiles instead of white ceramic penny rounds. But we are torn between the mini subway tiles and the 1x1 marble mosiacs, and bummed that both will take 3 weeks on special order to receive... Which do you prefer? We will be using the trim in the middle of this picture around the ledge:

1x1 inch square carrera marble mosaic:

Mini subway tiles:

Thursday, February 19, 2009
So much going on
Today Wren is officially 2 months old!

And she is definitely our child! After only 9 weeks of life she has witnessed a full bathroom renovation, the flooring on the landing being installed, the living room and dining room finished, and the beginning of the family room reno.
I am going to start re-tiling around the fireplace tomorrow and then we will install the floors. Even though we are not done the family room (hopefully be next week) I have not been able to resist picking up some great pieces! I have had my eyes on these Shabby Chic poufs for quite some time, envisioning how fun and perfect they would look in a well loved family room, and after seeing them in Kelly Wearstler's sons room I knew I needed a couple.

While browsing HomeGoods a couple days ago I just happened to stumble across a beautiful set of silver poufs on clearance for only $80 each!! I had already decided to do the family room in whites (of course!) and various shades of grey and silver so I could hardly believe my luck. Now we are on a mission for the perfect white sectional...
Tuesday, February 17, 2009
Wren Update
Wren had her 2 month check up and everything is going great so far! She has gained weight like a little champ, now coming in at a whopping 9 lbs, 5.6 oz. She is still below the 10th percentile on everything, but definitely not losing any ground which is great for a preemie.


To work on my photography skills I proposed a photoshoot to Wren and this pretty much summarizes the conversation that followed between us:


Yup, looks like the diva gene is definitely intact. Even though my subject was uncooperative I still managed to catch a few good shots.


Sunday, February 15, 2009
Tiny Smiles
Wren is starting to smile quite a bit, and who knew how much joy that would bring us? It is the best feeling ever to see that little tongue and those tiny gums. She smiles at the most random times, when we least expect it. Hopefully that is her way of telling us that we're doing a decent job so far.


New Header
Now that we have a new family member I thought it was time to update our header to include Wren. And WOW! where has Scrapblog been all my life??? I definitely have a new addiction!
Tuesday, February 10, 2009
Lazy Day
Daddy found us enjoying our favorite past time. Looks like the cats outta the bag on what we do all day.


Will you be mine?

Love is in the air here at Chez Holly & Sean as Valentine's Day fast approaches. We have kept the majority of our home decor packed away in boxes since we moved, where it will stay until we finish up our renos, so we don't have a lot of festive touches to put around the house but that hasn't stopped me from still adding a little LOVE to our front entry way. I came up with this fun project that literally only cost pennies, and could be customized to any saying you want.
What you will need:
- regular printer paper
- a computer and printer
- a scalloped scissor
- ribbon
- 2 tea bags
- small grommets or a hole punch
- a pad of brown ink
Step 1: Google sheet music and print off your favorite looking piece then soak it in tea for 5 minutes to age it's appearance.


Step 2: Take the aged looking paper out and let it dry. Once it is dry place it back in your printer and print off a phrase you like, with one letter on each page.
Step 3: Cut off excess paper with a scalloped scissor to create a romantic edge

Step 4: Take your brown ink pad and gently rub the scalloped edges on each page to add an additional aged touch
Step 5: If you have grommets, punch two on the top of each page, or just punch two holes on each page if you don't have any grommets handy.
Step 6: String a pink or red ribbon through all the letters and hang where you like!

Saturday, February 7, 2009
Lucky little Wren!
Today my Mom hosted a Valentines open house for all our friends and family to meet Wren. It was so wonderful and my Mom did an awesome job with all the food and decor! It was very exciting because Wren got to wear her first dress (which was still a little big, and she wore a shirt and pants under it to keep warm). I told everyone that we do not need anything, we just want to introduce her to everyone, but sure enough we were bombarded by hoards of gifts. The best part was that they were all very thoughtful and heartfelt gifts, which are always the best kind! My favorite part of the day was getting pictures of her with her Great Grandma, who I call the Baby Whisperer. In this shot Wren is being held by her Great Grandma, and her Grandpa is on the far left and her Grandma is on the far right (both in black).
Looks like Wren already has an Easter outfit thanks to her Great Aunt Colleen!

This little guy was freakin adorable!!! His name is Ratos and I am now obsessed with the Deglingos line of stuffed animals, they are hilarious looking (http://www.petitbaby.com/servlet/the-565/Deglingos-Ratos-the-Rat/Detail):
By the end of the day someone was ready for a nap on her Great Aunt Vicky's shoulder!

Looks like Wren already has an Easter outfit thanks to her Great Aunt Colleen!

This little guy was freakin adorable!!! His name is Ratos and I am now obsessed with the Deglingos line of stuffed animals, they are hilarious looking (http://www.petitbaby.com/servlet/the-565/Deglingos-Ratos-the-Rat/Detail):

By the end of the day someone was ready for a nap on her Great Aunt Vicky's shoulder!

Friday, February 6, 2009
I'm a little Teacup... Saucer
We all feel bad when we break a teacup, but you don't have to throw out the matching saucer. They can have a second chance at life in a variety of ways around your house. As I mentioned below, I snagged a bunch at an antique mall for $0.25 each to use a soap dishes but I recently found a variety of ways to use them around the house to add a cheap, easy, and fun touch of elegance.
They look adorable as saucers for small plants around the house:

Or set one on your bedside table to collect your rings, keys or coins at the end of a long day!

I am sure you all have some ingenious ideas on other ways to use them so please share because I still have a bunch I need to find homes for!
Instructions
Because I know that sometimes projects that look good on TV or in magazines are actually difficult to do on your own, I wanted to share the instructions on how we made our headboard because it actually was much easier than it looks.
Tools you will need:

Step 5: Once the first four staples have been attached, you can work towards the corners, in any order you like.
Step 6: Time to add the fabric! Do the first four staples the same way the batting was attached. It is really important to pull it VERY tight, and this may be where a second set of hands may be helpful. To keep the tightness and look consistant I put a staple every inch and a half or so.
Step 7 (Optional): If you would like to add buttons you will need to also add fabric to the back so you can sew them on. I just did a scrap piece of fabric pulled tight and roughly stapled every couple inches, no need to be tidy. I bought upholstery buttons that you cover in whatever fabric you choose, but you could use antique buttons or buttons you really like. You will need to attach them with upholstery thread and a long upholstery needle that is able to get through the layers of batting. You can add as many or as little as you like, in whatever pattern you want! Have fun~
And of course if you have any questions just ask! I would love to help~
Tools you will need:
- Staple Gun and staples
- Table Saw
- Drill
- 5 pieces of 2 inch by 1 inch wood in 6 foot planks
- 4 L brackets
- 2 T brackets
- Upholstery Fabric
- Cotton Batting
- optional: buttons, which also require an upholstery needle and thread
Step 1: Measure the size you want your headboard to be, the height and length are completely up to you!
Step 2: Mark and cut 2 pieces for the length of the headboard and 3 pieces for the height.
Step 3: Using the brackets, attach all the boards together like below.
Step 4: Now that the frame is built, it is time to pad it up! I used polyester batting, but you could use actual foam, or add more or less layers of batting depending on your preferences. I used 4 layers of batting, but to attach it, I just folded it over on itself 4 times so that I only had to staple the entire layer of batting once. The trick to stapling is to staple on the opposite side you attached the brackets on so that you don't have to worry about staples not going in, or working around the brackets. The first four staples will go in the order below, pulling each side tight before you staple.

Step 5: Once the first four staples have been attached, you can work towards the corners, in any order you like.
Step 6: Time to add the fabric! Do the first four staples the same way the batting was attached. It is really important to pull it VERY tight, and this may be where a second set of hands may be helpful. To keep the tightness and look consistant I put a staple every inch and a half or so.
Step 7 (Optional): If you would like to add buttons you will need to also add fabric to the back so you can sew them on. I just did a scrap piece of fabric pulled tight and roughly stapled every couple inches, no need to be tidy. I bought upholstery buttons that you cover in whatever fabric you choose, but you could use antique buttons or buttons you really like. You will need to attach them with upholstery thread and a long upholstery needle that is able to get through the layers of batting. You can add as many or as little as you like, in whatever pattern you want! Have fun~
And of course if you have any questions just ask! I would love to help~
Thursday, February 5, 2009
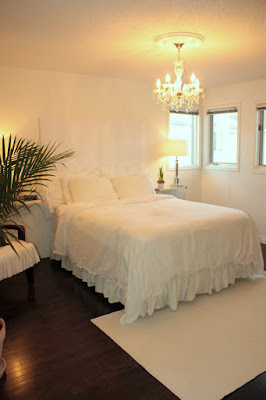
Master Bedroom
Well, it could still use a little art on the walls and some drapes but our master bedroom is pretty much done! And besides the floors and baseboards it was done for close to nothing. We used various pieces I had in the basement except for the new headboard (total work time was probably about 5 hours and all materials came to $95) and the shelves we are using as side tables (from ikea, 2 sets of brackets for $13 each and one piece of laquered wood we cut in half for $16).
Before:

After:


Before:

After:


Tuesday, February 3, 2009
getting there!
Now that our Master Bedroom is about 90% completed as far as the reno is concerned I am excited to start the decorating! Because we are still nowhere near completion on all our renos the decorating budget will be slim! I have always loved our bed (our very first purchase together!), but against the dark wood floors the detailing is lost, and I think we are just ready for a change. Here is a picture of our current bed (taken at our old house):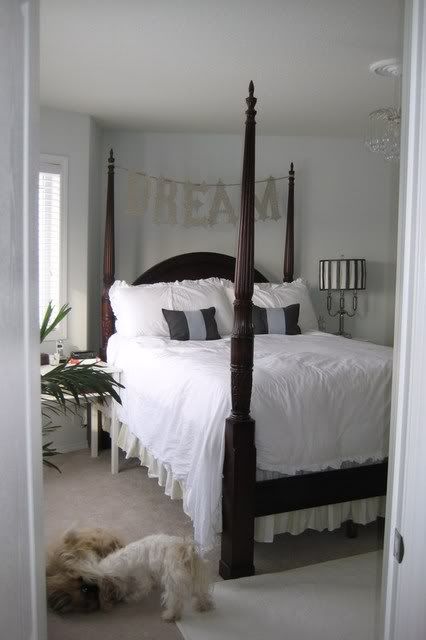
What do we want??? Something bright, airy, and fresh, similar to this Rachel Ashwell headboard:

But with a price tag of well over $1000 I thought I would give it my best attempt to recreate something similar myself . Pics to come tomorrow, so let's hope I can do it!
Sunday, February 1, 2009
Too cute to pass up!
While I am sad that my favorite local antique mall is temporarily closed until they find a new lease, I did score some deals the last weeks they were open. Several of those deals were tea cup saucers. At only $0.25 I grabbed a handful of unique patterns and designs with plans to use them as hostess gifts by placing a french milled soap on it, adding some fancy ribbon, and calling it a soap dish. I'm sure it has been done before by Martha or some other savvy home maker.
Since our new pedestal sink doesn't allow for a lot of room I placed one of the fun Royal Albert cabbage leaf saucers on it. Maybe celadon green will be our accent color for the powder room!

Subscribe to:
Posts (Atom)


